One of the props I did for the machinima was the camera.
I did roughly two sheets of design but lost them to file corruption. The idea behind the camera is that it can move along a sort of rail along the ceiling, whereas it's spherical shape allows it to look in any direction unhindered.
The sphere and camera are the same object; there are two more objects to the camera, a beveled square block and a pentagon surrounding the sphere that looks like it holds it in.
It didn't take long to prepare or animate or make, though I believe it did it's job well if only to be on screen for a very small amount of time. This use of prop efficiency I think is rare, as there are few such things that can convey so much narrative in so short amount of time. I could and would have made additional props had I more time that could or would contribute to the same effect.
Another prop necessary for perhaps one scene alone was the bomb planted by the ninja, made by another groupmember.
Baring in mind I didn't work with Unity as much as I did with Maya for this module, I decided to take a moment to reflect on the differences, generally the benefits and drawbacks I was able to pick out.
When it comes to animating, Maya I felt is superior and that seems to be the consensus amongst most people. I recall how adjusting the camera seemed to be a more complex job in Unity than it is for Maya, and that complicated scripts are apparently required to make objects move on their own.
However, it was useful that sound files in .aiff format could be dropped straight into Unity. Also, we didn't need to spend many hours rendering it and editing it in Final Cut.
I made my animations with many different cycles which I felt was more more efficient than manually animating each scene; although it did mean some planning and confusion followed placing my characters and their cycles in the scene until they could be sorted out accordingly. For example the character would often be dragged to one location but end up elsewhere when the scene is played because the character moves, whereas at other times it displays where the character moves to, rather than where he starts off. It took a fair bit of fiddling to get it right, but the benefit is, it made it very easy to make the necessary changes and re-export it.
When it comes to environments though, Unity is a powerful tool in terms of it's lightning and particle effects, which would be a much more complicated job in Maya; and the scripts, whilst they can be a drawback by making things complicated, are actually a great asset. The lighting in the second scene in particular I think is very impressive (that would be Andy's handiwork I think as he handled the environments).
Until this point there seemed to be little difference or point to exporting it to unity, as it still looked like a Maya animation to me, though that might have just been because I felt more comfortable working with it because I had done it before. Expanding my horizons in this module by introducing Unity and Maya for animation has made me realise that whilst they both have their areas of specialization, they are equally potential when it comes to producing animation.
It's hard to see where the boundaries for each area of the ninja are; but the legs are located to either side at the bottom whereas the chest is located in the middle, whereas the arms are located at the top either side of the head.
It took many tries to get the textures right and plenty of planar mapping. I wasn't able to fully unwrap the chest after hours of trying, so rather than waste more time trying to I decided to go ahead and correct whatever needed correcting with UV mapping.
Overall I felt that the environment was so dark that a dark textured character would be hard to observe in detail. At any rate, the feedback and general consensus I got on my model earlier is that it was well textured and appropriately coloured for the role.
I'd devote more time to texturing it better next time, but I felt like getting to the animation was more important and I think with the amount of animations I was able to get done, it payed off.
This was going to be in the credits as little more than a humorous occurrence to happen in the background. As we never ended up producing credits, however, the animation went unused as it is hardly appropriate for the ninja's role in the film.
That said, everything in this animation is intended, including the lengthening of his neck and waving of his arms. It is by no means even an attempt at making a professional, well-made dance. But it made me laugh and thought it would be a fun thing to have at the end of the animation.
Here is the animatic I quickly whipped up using Final Cut Pro and images made from an updated storyboard. The main point was to get a good grasp on how long the scenes out to be and particularly what sounds we ought to use. The group liked my choice in sounds from what we had availible and so we referred to the actual Final Cut Pro file to get the exact sounds we wanted to use.
I didn't include ambient sounds as I felt it was unnecessary to ti
me them as keenly; these are essentially just to prevent any scene from being completely quiet.
In a group crit session I recieved a lot of positive feedback on the ninja animations I had prepared at the tine; a run cycle, a sneak walk cycle, a charge cycle, a sneak idle cycle, a stood still cycle, a roof-drop and the 'no' animations.
The variety of the animations was well recieved, as well as the colour and textures of the model. The animation was also said to fit well with the model, which I attribute to my character referencing and research behind types of movement I explored in my concept art.
A few suggestions were made which I took to heart and eventually changed; adjusting the angle of the ninja's head during the sneak animation, raising the feet off the ground more, and that some of the animations were a little wobbly. I agreed especially in the case of the original charging animation and so made changes to the waist and spine controllers to not move as much.
Overall a good response I'd say, but I certainly learned you can always do a little more than what you've already done.
Here's an interesting video about the latest installment to Hideo Kojima's Metal Gear Solid franchise.
'Ground Zeros is a prelude to Metal Gear Sold 5 and features a brand new open world style gameplay never seen before in a MGS game. Built on the brand new Fox Engine gamers can look forward to experiencing the Metal Gear Solid Universe like never before.'
I'm not one for praising graphics as I understand that graphics are mostly a thing of the past, in the sense that they were once something to boast about. Now you would be met with an unwavering barrier of 'games are more than graphics!'. Whilst that is true and I am in agreement, I still understand that graphics are to be acknowledged, especially because we are advancing into new technologies, and now, new engines.
The way this video blends from in-game machinima to the playable game is so seamlessly done that I had to watch it twice. I believe this very well might be where the future of games is headed, without loading screens or waiting times that ruin or break immersion, but a seamless storyline from start to end like a film. As for the machinima, the greater half of this video, I believe it to be just as awe inspiring and that soon we may again see games developers locked in a battle to have the most triumphant graphics, last seen in the original console / platform debates.
Being a huge fan of films that incorporate choreography, especially in fighting, into their animations, I did a little research into how this is done through animation, if it came to the circumstances that I would animate my ninja character to do a fighting scene with the guard.
I realise now that it would have been a heavy time investment, but I'm still keen to animate something like this and it's probably something I'll do in my own time at some point.
I found a stop-motion of a fight between two dolls to be both entertaining and inspiring in it's choreography. It was made by Oliver Trudeau
So I looked up machinima that have fight scenes but from what I found, there arn't any with the same caliber; which is quite confusing given the number of attack animations typically found in most games. However, these animations are little more than swings through empty air, where your are to place your character in a location to make such an attack seem like it hits.
The animation above is fully choreographed and thought out, and overall just seems better in how it is developed and made, and I attribute this to the fact that everything was done by hand and so had to be planned out.
As far as Warcraft machinima goes though, it is still a brilliant piece.
Now for another resource of machinima that I have found great over the years.
http://warcraftmovies.com/ is a brilliant website in which many machinimators and movie-makers upload their works to for the world to see. All content is exclusive to World of Warcraft machinima so if you're looking for a variety of games, it isn't the best place to go; but I reckon there is more WoW machinima produced than anything else, not only because of how many players there are, but because it is so easy to produce with tools such as WoWModelViewer.
The tool allows to to load any model, equip them with any in-game gear, and have them perform a particular animation at a slowed down, normal or sped up pace. The background can be changed to green to chroma-key the character with a green screen effect, making it brilliantly easy to record the characters doing the animations and drop them into a background.
This is exactly how Divided Soul by Martin Falch - the machinima above, as well as his other work, Tales of the Past III, was made. Nearly all WoW machinimas are made this way, though that's not to say it's the only way they are made.
I have downloaded WoWModelViewer myself but because of a lack of certain software to greenscreen, etc, I haven't been able to make machinima of my own this way. I have used it to make some art, but I recognize it is a powerful tool and making machinima with it is certainly on my to-do list.
I thought I'd do a blog on the various machinima I've seen.
Needless to say that over the years I've watched a lot of it, but these are among my favourite. These pieces were made from in-game graphics, but using custom animations. They were probably made as part of the game's advertising campaign targetting MMO players who were tired of the same fantasy setting.
This machinima piece, a full 90 minute movie made from in-game animations, locations, and lore of the World of Warcraft was produced and directed by Martin Falch. I'm quite certain I've blogged about it at least once already. I still find it relevant because in comparison to the machinima above, it is produced in a different way.
Finally there are the cutscenes-turned-bloopers from Metal Gear Solid 3, which I only found recently. As well as being hilarious, they count as machinima. Like the Global Agenda machinimas, they are produced from in-game graphics but with custom animations. The Metal Gear games are heavily story orientated and so have a lot of cutscenes. I imagine the character animators produced more animations for the cutscenes then they did for the actual gameplay. This serves to establish a 'playable cinematic experience'.
This is the skeleton for my ninja in his stood-idle pose. I wasn't too happy with my rigging and it's something I've resolved to practice in the future in order to perfect it. I was able to animate the character perfectly fine, but at times I found my rig confusing. Here I'll outline some of my problems and my workarounds or solutions for them.
I do partially blame it on circumstances beyond my understanding. What should have been a simple fix of parenting one joint to another often resulted in a joint vanishing entirely for no apparent reason, and thus made it hard to fully rig the model without losing vital skeleton parts.
I encountered the same problem in my alien rig, meaning there is likely something I am missing out or doing incorrectly when it comes to the earlier stages of rigging. It was a much better idea than have parts of the skeleton missing entirely.
On the other hand it didn't make it impossible to rig; it just meant that I had to animate it differently than I otherwise could, and even in such circumstances I would probably animate it the way I did regardless, as I didn't take much note of the problem because it didn't interfere much at all with my animating.
For example, tilting the head backwards with the neck joint resulted the character (for whatever strange reason) turning it's head around 180 degrees. To avoid this, I simply adjusted the head with the head controller.
Another problem I had, but before animating, was particular vertices in the chest moving when the shoulders were adjusted. It goes without saying that this gave me a fair bit of confusion but it was the result of some of the vertices not having any influence on them. After painting influence on them to joints more relevant to the vertices locations, e.g the spine controllers, it was an easy fix.
So all in all I learned that my rigging is still hardly perfect, but when it comes to animating it can do the job; I also learned a little about the rig's problems each time I produced a new animation and so updated it slightly for each animation, e.g some of the controllers not paired to each other.
Here is the newer version of the concept art image I did for the ninja character, with updated line-art and generally more distinguished colour. Aside from colour being the main difference, in many different ways; the model is black and red whereas this concept art depicts it as silver, grey and purple, there is very little difference between them except the shoulder guards, the decision behind removing them I have already explained.
In short, when referring to my character research and reference images, I wanted to give the character a very humanoid, un-armoured look, as I feel it detracts from his aesthetic as an agent of espionage.
I still feel I have managed to keep the space-age feel of the character whilst he is explicitly not a simple gun-man or soldier with a talent for hiding. I think the colour scheme is important because it gives him both identity and anonymity. I felt that he contrasted well to the dark environment the machinima was set in and it sealed his place as a character that has stayed true to the original concept art.
In order to help establish what kind of animations, poses, and overall role the character I was developing would play in the animation, I have a few more pieces of concept art.
This picture actually came to be used in the development of the game environment, referred to as the generator room. This room plays an important part in the narrative of the machinima. The ninja is shown hiding behind a wall.
Similar to something I remember from Splinter Cell and the Tenchu franchises, here the character is shown dropping down from the ceiling to take care of this guard.
These pictures helped shape the way in which the character moves, or rather, prowls around the environment, appearing only to dispatch his enemies and disappear back into the shadows.
To which point, most people might ask why he wears the red lights. Whilst it is mainly a design feature, and that so he can be more easily seen in the machinima, the lights are intended to change colour to blend in with their environment, so if he wanted to he could blend in against a wall of control panels and lights if he wanted, or remain totally hidden. They can also flash and distract an enemy, making it hard to pinpoint what part of the body they want to shoot at.
When coming up with ideas for animation, it didn't escape us that we needed the appropriate sounds. Sourcing them from around the internet is a good idea if you're looking for a wide range of things, but we knew what we wanted and we needed it in high quality; and there is arguably no better place to get it than in the sound booth.
With the use of the computers, microphones and software available to us, we found appropriate sounds in .aiff format, which we were able to drop straight into Unity. We gathered and even created some music just in case we felt the need to use it, and many sounds; both ambient and for particular scenes.
We also recorded voices. I voiced the ninja character's single line whereas groupmembers Daniel and Andrew voiced the guards; Andrew voicing the one who ends up being killed by the ninja and Daniel voicing the one who catches the ninja in middle of a particularly dangerous act. We distorted the voices heavily in order to preserve the futuristic feel of the voices being changed by the suits the characters wore, and overall I think it worked. I think we're all quite satisfied with the sounds we gathered and the sounds we used, and I'm glad we gathered as many sounds as we did even if we didn't use them all.
It has made me aware of what a great facility the room is and I definitely want to use it more in the future.
When the time came to animate our alien models, I had encountered problems with my rigging made earlier and decided rather than try to correct them now and catch up later, I would make use of the demonstration model and animate that.
It was amusing, for one thing, to see the character I had animated duplicated several times over and made to dance, but it did provide insight into how to go about it and it was fairly simple.
Import that asset as an FBX (after exporting it in Maya with all the right settings - bake animations, select frames to be animated and embed media). In Unity's Inspector, I was able to chop up the animations by entering which animation took place during which frames, e.g the walk cycle was 1 - 100, the jump animation was 101- 200, and the creepy dance animation screenshotted above was 201 - 250. With a script, we were able to have the animations play randomly one after another.
This is the method in which we would produce the Unity turntables for our characters.
Before the final design of the ninja was sealed, I made a few experiments with his face. As you wouldn't be able to see the character's face directly, I felt it was important to create a cool design to substitute for it. I experimented with ideas such as a headset and goggles with a cloth rag over the mouth, but I felt this design in particular felt out of date to the rest of the character's attire and would require a complete overhaul.
I experimented with character ideas and inspirations such as Venom, including more visually haunting eyes and an alien mouth. Whilst I felt it was a cool idea, it was simply a case of 'I don't really want him to look like that'. I experimented with a single visor, taking inspiration from the large alien robot in The Day the Earth Stood Still, but thought it looked more like Robo-Cop when equipped on a human.
I thought the original idea captured what I wanted best and applied a few tweaks as to how it could be changed.
I went with the bottom - middle design.
I then decided to figure out how the mask would open up, not knowing if this would even be necessary in the machinima, but it would provide some sort of character development. The two plates that cover the mouth would split open and be drawn back to the cheeks, whereas the face-plate would slide up over the forehead.
Having compiled my ideas I came up with this character. I experimented with colour themes in order to see if the visual impact it had helped shape the identity of the character and the role they would play in the film, which I found to be exactly the case.
The first version I produced was a simple standing character that I would use for reference when developing it in Maya. It is an older version of the concept art but visually no different from the below character image I worked on afterwards, aside from a few tweaks and the removal of the shoulder guards.
The shoulder guards I felt would only herald clipping issues in the various poses I intended to animate the character in, and substituted them instead for the small spikes on each shoulder. The red and black theme also makes the character appear more sinister and lethal, which is hardly going to ruin any ninja's career prospects.
Simply referred to as The Ninja, he would play as the antagonist of the guards on the ship, seeking to interrupt whatever business they have going on there. On that note, it's unclear as to who is the 'good guy' and the 'bad guy' in the current machinima storyline, but I think that only makes it better, as we're left to our own devices about what is going on and why.
I thought long and hard about the character I wanted to portray as seemed to be going down the route of developing our characters before the storyline. Then again, we didn't know what storyline to go with without first having characters, so there was no harm developing it this way.
One character was quickly established; a guard or a mercenary of sorts, equipped with space-age firearms. I decided to make something that contrasted well with this kind of character.
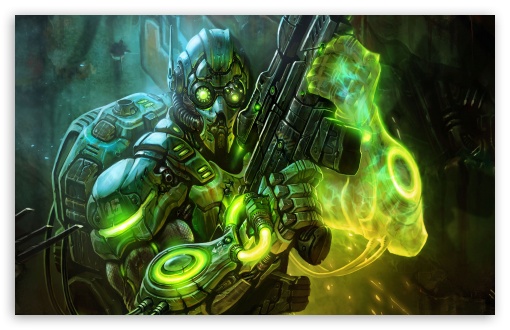
Sam Fisher was the first character reference I used and set me on the path of the kind of character I wanted to develop; not only because of his role in the games he is cast in, but also his overall appearance; especially the night vision goggles. I wanted to recreate something similar to this but more similar and with a less uniform appearance, to give the character a greater appeal of individuality and a lone-wolf identity.
Samus was the next character I looked at as it had the kind of appeal I was looking for, but looks too alien for my liking. I wanted the character I developed to be identifiable as a human, whilst still maintaining a space-age / futuristic identity. I took it back a notch and another character appeared in my inspiration list.
My own experience with the Crysis game series is limited to playing round my friend's house and kicking a few chickens around in the super-powered suit, but it was enough for me to remember it here. It had everything I was looking for; Sam Fisher's goggles, a distinguishable human shape and appearance, and contrary to the high tech weaponry that the character's enemy in the machinima - the guard would have, this character uses something a little unorthodox.
I found a similar character within the Starcraft universe, but thought he was a little over-dressed and armoured.
With the necessary reference material for developing the character, I know it will be much easier and a more liner process than trying to think of it out of my head alone.
When we came to make the alien it meant making use of many tools we were already aware of, and so building the geometry wasn't so much of a challenging prospect, although it still took a reasonable few attempts in order to finish with something I wanted to bind to a skeleton.
I thought back of when I was building the tree when first learning how to make use of the extrusion tool, which was perhaps the primary tool used in the construction of the alien's geometry. I was warned not to use too many polygons in my models (that is apparently a frequent problem I tend to make). Unfortunately I probably took this a little too literally and removed many more polygons than necessary. Whilst I did look at face typology and had reference images to work with, I frequently studied my model in smooth preview. Admittedly I think I removed too many edged, resulting in some of the faces of the geometry covering a wider area than they ought to. This would certainly be the change I would make if I were to do it again.
Regardless the model turned out quite well and I would soon after move on to texturing and animating it.
When it came to develop where our machinima would be set, we produced concept art. I first started with the western idea, as the brief we were given included an option as to how the narrative in the machinima played our. I liked the idea of two characters having a trade-off in a scenario reminiscent to that of Sergio Leone's Western film trilogy, and features a potential character to help portray my idea of this.
Lastly, I produced a space environment as we were narrowing our decision to something more sure and definite. I was still keen on my western idea at the time - space age, futuristic stuff as strange as it sounds has never interested me much in terms of games. But I figured if I'm going to work on developing this machinima I could have my influence on it's direction.
This is the second piece of concept art I created and although it does look similar to the underwater city seen in Star Wars I: The Phantom Menace, my main inspiration / influence for this particular work was in Genndy Tartakovsky's Samurai Jack and the city of Aquiatus (if memory serves me correctly). I thought an underwater environment was quite original and leaves plenty of room for variation; it could be fantasy as depicted here with the whale with four fins and bio-luminescent lights, or could be reality accurate, and I expand my referance imagery with deep sea-level photos and images.
I also had art for a volcanic setting but by the time I had produced these three we had made a decision on a futuristic, space-age environment.
I think using the space environment was a good idea. There was little limitation in what we could or couldn't do and we could portray it however we liked. At the same time it also imposed some rules in what we could do and so set us on a path of design that wouldn't have our ideas deviate so drastically as to be irrelevant.
Eventually, we decided on a space level and I began to develop a character for it, whilst leaving the design of the spaceship's interior to other members of the group.